Frozen shoulder (or adhesive capsulitis in doctor-speak) is common in people between ages 40-60 – especially if you’ve got Diabetes..
Sometimes following a minor injury (sometimes not), your shoulder starts to go stiff and painful, and you find yourself having trouble putting your clothes on and brushing your hair..
The good news is that – by nature – it’s a self limiting problem. Meaning your shoulder will ‘thaw’ in time. However it’s not much of a consolation to many of my patients when I tell them they will be better in a few months.
To help speed up recovery – and to improve shoulder movements, I usually send my patients to a friendly physiotherapist.
If you’re at home, here are 7 exercises you can do in about 15-20 minutes to make your shoulders (frozen or not) more flexible.
They are specifically designed for patients with frozen shoulder, but as they are simple, everyone in the family can join in.
They also work for other shoulder problems like rotator cuff injuries, shoulder tendinitis and impingement as they strengthen the rotator cuff muscles.

- Pendulum Exercise
Stand and lean over slightly, letting the affected arm hang free. Relax your shoulders completely.
Start swinging your arm in a small circle – 10 times clockwise, then 10 times anti-clockwise.
Do this in the morning and in the evening, making the circles larger as your shoulder gets better. If it gets too easy, you can increase the stretch on your shoulder by holding a small weight (eg. a 500ml bottle full of water) while doing the exercise.
(Note: Don’t stiffen up your arm. The swinging movement should be from your shoulder – NOT your elbow or wrist)

2 . Towel Stretch
Get a small towel that you can hold behind your back as shown in the diagram.
Start with both hands at the same level (near your buttocks) and use your good arm to pull your affected arm upward to stretch it.
Once you have pulled it up as much as you can, count slowly to 10, then relax.
Do this 10 times in the morning and 10 times in the evening.
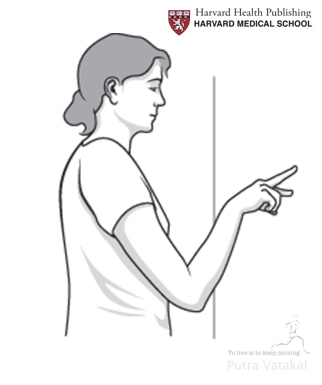
3. Spider Climb
Stand facing a wall (about 3/4 of an arm’s length away).
You should be able to reach out and touch the wall with your fingertips as shown in the diagram.
With your elbow bent, slowly walk your fingers up the wall until you have raised your arm as far as you can.
Lower your arm slowly and repeat 10 times in the morning and 10 times in the evening.
(Note: Your fingers should be working as you climb up the wall – not your shoulder muscles. If you feel pain in your shoulder while lowering your arm, use your other hand to support your affected arm while lowering it).

4. Cross-Body Stretch
Lift your affected arm at the elbow using your good arm. Bring the affected arm up and across your body, gently stretching your shoulder.
Once you have brought your affected arm as much across as you can, hold it and count to 20.
Repeat this 10 times in the morning and 10 times in the evening.
(Note: You can do this while standing or sitting down)
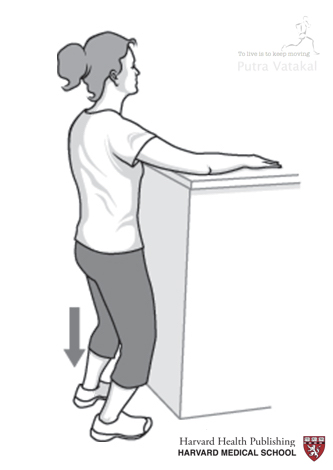
5. Squatting Shoulder Stretch
Using your good arm, lift your affected arm onto a shelf or other surface at about the level of your chest.
Slowly bend your knees, lowering your body and opening up your armpit. Hold for 5 seconds, then straighten up again.
Try to squat a little lower each time. Do this 10 times in the morning and 10 times at night.
(Note: If you have knee problems, then it may be better to concentrate on doing the other exercises)

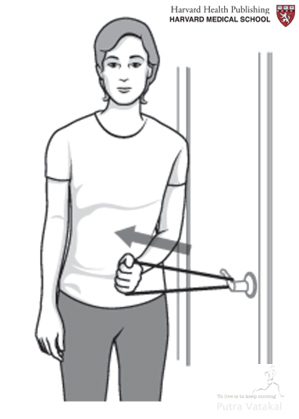
6. Outward Rotation Strengthening
You’ll need a rubber exercise/ stretching band.
Hold it between your hands with your elbows held close at the sides of your chest and elbows bent to 90- degrees (as in the diagram).
Rotate the lower part of your affected arm outward about 5-10 cm. Hold for 5 seconds.
Do this 10 times in the morning and 10 times at night.
(Note: Start Exercise 6 & Exercise 7 about 3 weeks after you’ve regularly done Exercises 1-5)
7. Inward Rotation Strengthening
You’ll need a rubber exercise/ stretching band.
Stand next to a closed door. Tie or hook one end of the band around the doorknob. Hold the other end of the band in your hand (of the affected arm).
Hold your elbow close to the side of your chest and keep your elbow bent at 90 degrees (as in the diagram). Pull the band toward your body about 10cm and hold for 5 seconds.
Do this 10 times in the morning and 10 times in the evening.
(Note: Start Exercise 6 & Exercise 7 about 3 weeks after you’ve regularly done Exercises 1-5)
Are you a happy patient?
While I do my best to provide cutting-edge orthopaedic surgical care, I firmly believe that God heals – I’m just here to help you on your body’s journey to recovery.
If you are happy with how you have recovered, or if this website helped you, feel free to leave a note about your own journey here (Google Reviews):
*These images have been adapted from Harvard Health Publishing, a division of Harvard Medical School. A big thank you to physiotherapist Maalini Devi for always being open to our musculoskeletal consults.